How to Run Qwen 3.6 27B on a Single RTX 5090 (The Full Guide)
How to Run Qwen 3.6 27B on a Single RTX 5090 (The Full Guide)
1. Unleashing the Power of Local AI
Imagine having a world-class AI running directly on your personal computer. No internet required. No monthly subscription fees. No one else reading your private code or sensitive documents.
That's exactly what you get when you pair Alibaba's Qwen 3.6 27B dense model with NVIDIA's flagship RTX 5090 graphics card.
Why this specific setup changes everything:
- Near-instant coding suggestions that never leave your desk
- Total data privacy because your files never touch a corporate server
- Zero dependency on cloud API bills that scale unpredictably
- Complete ownership of your AI infrastructure
A Docker container is simply a clean, pre-packed digital box that has all the correct software tools already inside it, so you don't have to install forty different items on your computer manually. We'll use this approach to keep things clean.
By the end of this guide, you'll go from a blank terminal screen to a fully running, blazingly fast private AI server on your RTX 5090. Let's get started.
2. The Hardware & Software Checklist
Before we install anything, let me confirm you have the right setup.
What You Need:
| Component | Requirement | Why It Matters |
|---|---|---|
| Graphics Card | NVIDIA RTX 5090 (32GB VRAM) | The 5090's massive 32GB memory fits high-quality Qwen files comfortably |
| Operating System | Ubuntu 22.04+ or Windows 11 + WSL2 | Linux gives best GPU performance |
| System RAM | 32GB minimum (64GB recommended) | Handles context windows and system overhead |
| Storage Space | 60GB free SSD space | Room for model files and dependencies |
Core Driver Installation
First, verify your NVIDIA drivers are installed and working:
# Check your GPU driver version (need 550 or higher)
nvidia-smi

# You should see your RTX 5090 listed with driver version
# Expected output shows CUDA Version: 12.x
If nvidia-smi doesn't work, install the drivers:
# Ubuntu/Debian users
sudo apt update
sudo apt install nvidia-driver-550
sudo reboot
For Windows users: Install WSL2 first, then install Ubuntu from Microsoft Store. The NVIDIA drivers on your Windows host automatically work inside WSL2.
⚠️ Critical Alert: The RTX 5090 requires driver version 550 or higher. Older drivers will crash immediately when you try to load the model. Run
nvidia-sminow to verify before proceeding.
3. Which Model Weight File Should You Download?
The RTX 5090 has 32GB of VRAM—that's massive for a consumer card. But you still need to pick the right model file format for your specific use case.
Here are your best options from Hugging Face:
| Model Version Format | File Size on Disk | Active VRAM Footprint | Speed (approx) | Best For |
|---|---|---|---|---|
| BF16 (Uncompressed) | ~54GB | 54GB+ | Fails / OOM | ❌ Won't fit on single 5090 |
| Q8_0 (8-bit) | ~28GB | ~30.5GB | ~90-100 tokens/sec | Maximum intelligence, complex reasoning |
| Q6_K (6-bit) | ~22GB | ~24.5GB | ~115 tokens/sec | Sweet spot for quality & speed |
| Q4_K_M (4-bit) | ~16.8GB | ~19GB | ~145 tokens/sec | Fastest coding assistant |
My recommendation: Start with Q6_K if you want the best balance. Use Q4_K_M if you're building a coding assistant that needs instant responses. Avoid BF16 entirely—it doesn't fit.
Download the file using huggingface-cli:
# Install huggingface tools
pip install huggingface-hub

# Download Q6_K version (recommended for first-try)
huggingface-cli download \
    Qwen/Qwen3.6-27B-Instruct-GGUF \
    qwen3.6-27b-q6_k.gguf \
    --local-dir ./models/qwen36
4. The Step-by-Step Local Deployment Guide
Now for the main event. Follow these five steps exactly.
Step 1: Set Up a Clean Python Environment
A virtual environment keeps your AI tools separate from your other Python projects. This prevents package conflicts.
# Create a fresh directory for this project
mkdir qwen-local
cd qwen-local

# Create a Python virtual environment
python3 -m venv venv

# Activate it (Ubuntu/Mac)
source venv/bin/activate

# For Windows users:
# venv\Scripts\activate
Step 2: Install vLLM (The Fastest Inference Engine)
vLLM is a high-speed serving engine specifically designed for dense models like Qwen 3.6. It's significantly faster than alternatives like llama.cpp for production setups.
# Install vLLM with CUDA support
pip install vllm

# Verify installation
python -c "import vllm; print(f'vLLM version: {vllm.__version__}')"
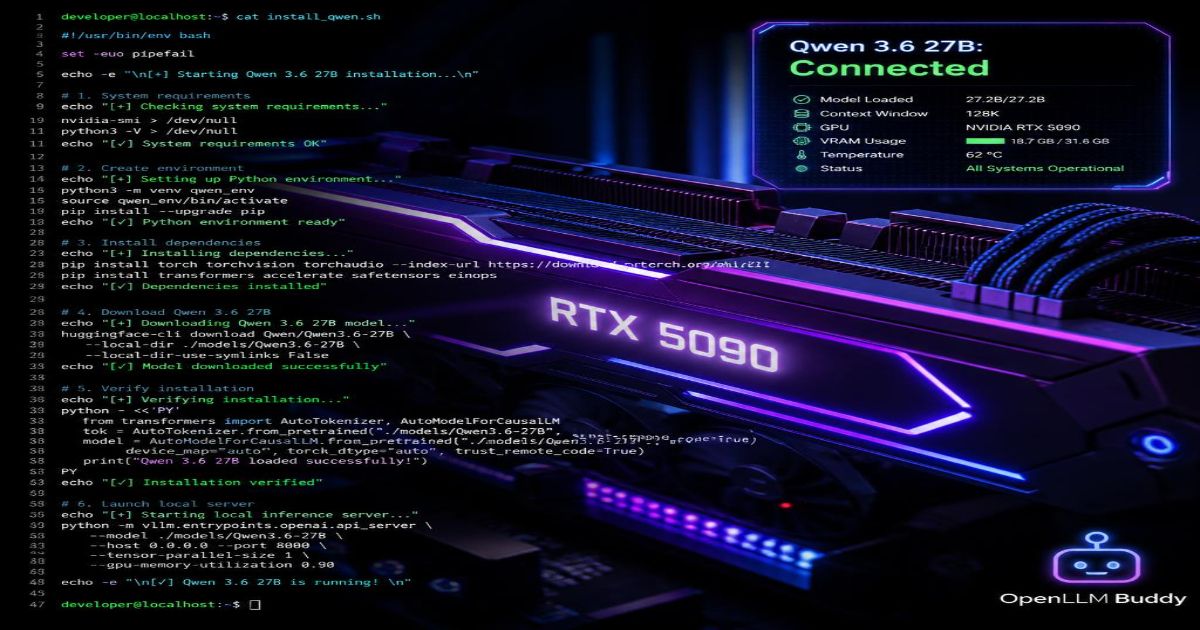
Step 3: Launch the Model Server
This command starts your private AI server. It will load the model into your RTX 5090's VRAM and keep it ready for instant responses.
# Launching your high-speed Qwen server on a single RTX 5090
python -m vllm.entrypoints.openai.api_server \
    --model ./models/qwen36 \
    --tensor-parallel-size 1 \
    --gpu-memory-utilization 0.90 \
    --max-model-len 32768 \
    --port 8000 \
    --trust-remote-code
What each flag does:
--tensor-parallel-size 1→ Uses just one GPU (perfect for your single 5090)--gpu-memory-utilization 0.90→ Uses 90% of your 32GB VRAM (leaves room for system)--max-model-len 32768→ Supports up to 32,000 token conversations--port 8000→ Makes the server available athttp://localhost:8000
💡 Performance Tip: First load takes 30-60 seconds while the model loads into VRAM. Subsequent requests are instant. Be patient on the first run.
Step 4: Test Your Server (In a New Terminal)
Open a second terminal window (keep the server running in the first one). Run this test script:
# test_qwen.py
import openai

# Connect to your local server
client = openai.OpenAI(
    base_url="http://localhost:8000/v1",
    api_key="not-needed-for-local"
)

# Send a test prompt
response = client.chat.completions.create(
    model="qwen",
    messages=[
        {"role": "user", "content": "Write a quicksort algorithm in JavaScript with comments"}
    ],
    max_tokens=500,
    temperature=0.7
)

print(response.choices[0].message.content)
Run it:
python test_qwen.py
If you see JavaScript code printed in your terminal, congratulations! Your RTX 5090 is now running a production-grade AI server locally.
Step 5: Optional - Keep Server Running in Background
To run the server permanently (even after closing your terminal), use tmux or screen:
# Install tmux
sudo apt install tmux

# Start a new tmux session
tmux new -s qwen-server

# Run your vLLM command here

# Detach with Ctrl+B, then D
# Re-attach later with: tmux attach -t qwen-server
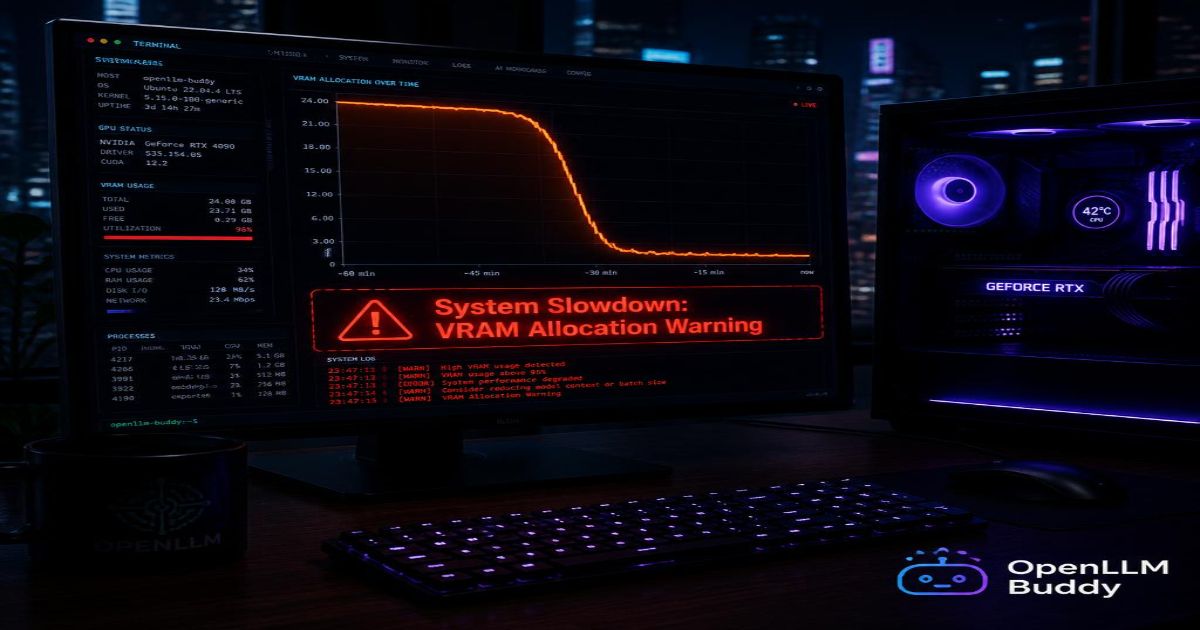
5. The Context Crash Wall: When Local Code Hits a Limit
Here's the reality check that every local developer eventually faces.
While your compressed Q6_K or Q4_K_M file fits on your RTX 5090 smoothly at first, things break quickly when you use its massive 128,000-token context window.
What happens as you feed more data:
- You paste a 50,000-line code repository for analysis
- You upload a 100-page technical document
- You run a long debugging session with 200 message exchanges
The KV Cache is like the temporary scratchpad memory the AI uses to remember what has already been typed in a long conversation. As your conversation grows, this cache expands dramatically.
| Context Length | Additional VRAM Required | Will Your RTX 5090 Handle It? |
|---|---|---|
| 4,000 tokens (short chat) | ~2GB extra | ✅ Smooth sailing |
| 16,000 tokens (medium doc) | ~8GB extra | ✅ Still fine |
| 32,000 tokens (codebase) | ~16GB extra | ⚠️ Tight but works |
| 64,000 tokens (large project) | ~32GB extra | ❌ OOM crash |
| 128,000 tokens (full window) | ~64GB extra | ❌ Impossible |
What happens when you run out of VRAM:
- Your terminal freezes with an "Out of Memory" (OOM) error
- Your GPU fans spin to maximum while performance drops to a crawl
- The server crashes and you lose your conversation context
⚠️ Crash Warning: If you're processing large code repositories or long documents, monitor your VRAM usage with
nvidia-smi. When usage hits 95%, your server is about to crash. Reduce your--max-model-lenor switch to cloud infrastructure.
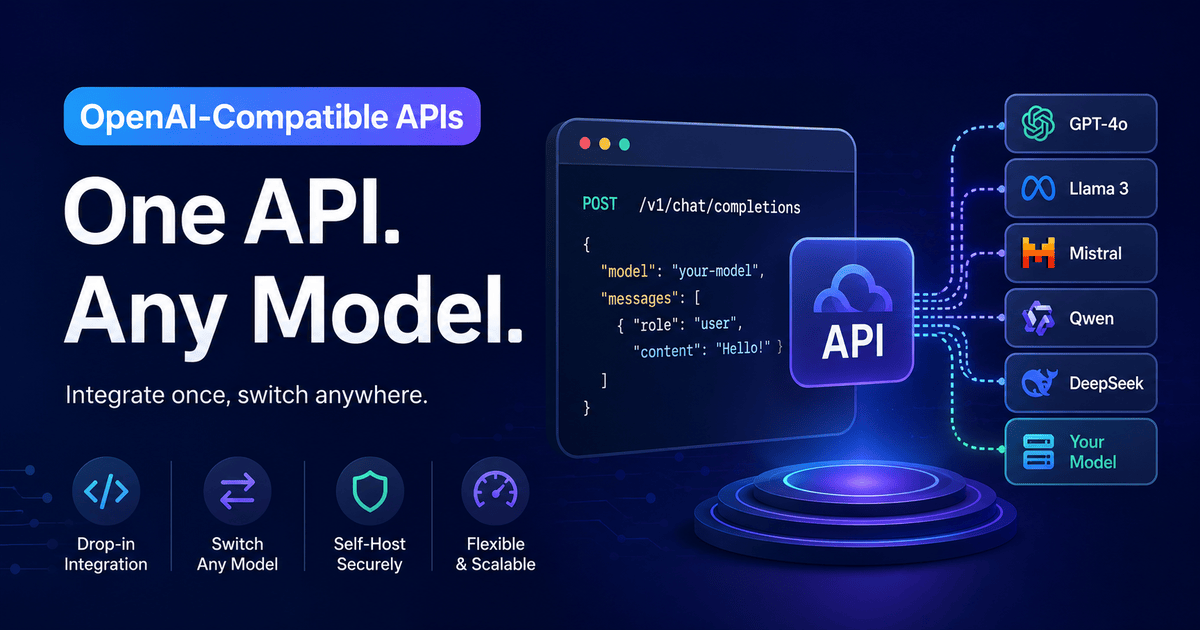
6. Scalability Without Borders: Transition Seamlessly to OpenLLM Buddy
You've built a working local setup. That's awesome. But what happens when your projects outgrow your single 32GB card?
Introducing OpenLLM Buddy → https://www.openllmbuddy.cloud/
What OpenLLM Buddy Does
It allows you to keep using the exact same software setup and OpenAI-compatible API you just learned. But instead of being limited to one RTX 5090, you offload the heavy work to massive cloud graphics networks featuring:
- Premium NVIDIA RTX 4090s and RTX 5090s
- Multi-GPU clusters for massive context windows
- Lightning-fast RunPod server architecture
You get a ready-to-use API link instantly.
Our Disruptive Value Proposition
OpenLLM Buddy entirely eliminates confusing, metered token pricing schemes.
We charge your team a tiny flat rate strictly for the raw minutes our cloud hardware is running.
- Your input tokens? 100% FREE
- Your output tokens? 100% FREE
- Your massive 128,000-token conversations? 100% FREE
- Running autonomous agents overnight? Still the same flat rate
Bridge Your Local Setup to the Cloud in Seconds
Here's how you update your existing code to access unlimited VRAM with zero token fees:
import openai

# Your local setup (limited to 32GB VRAM)
# client = openai.OpenAI(
#     base_url="http://localhost:8000/v1",
#     api_key="not-needed"
# )

# Move to heavy cloud VRAM with zero token bills
client = openai.OpenAI(
    base_url="https://api.openllmbuddy.cloud/v1",
    api_key="YOUR_OPENLLM_BUDDY_KEY"  # Get yours in 60 seconds
)

# Same code. Same model. Unlimited context window.
response = client.chat.completions.create(
    model="qwen-27b",
    messages=[
        {"role": "system", "content": "You are analyzing a massive codebase"},
        {"role": "user", "content": "Review this 100,000-line repository for security issues"}
    ],
    max_tokens=4000
)
The Total Creative Freedom
With OpenLLM Buddy, you can:
- Run massive code-base repositories all night without OOM crashes
- Let your autonomous background software agents loop infinitely without budget anxiety
- Use maximum uncompressed BF16 precision files that wouldn't fit on any single consumer card
- Never worry about room heat, power bills, system RAM crashes, or expensive token invoices again
Your RTX 5090 is perfect for daily development work. But when your project demands more—more context, more speed, more uptime—OpenLLM Buddy removes every ceiling.
Your Local AI Journey Starts Now
Here's your action plan:
- Verify your RTX 5090 driver (
nvidia-smi→ needs version 550+) - Download a Q6_K or Q4_K_M model file from Hugging Face
- Run the vLLM server using the command in Step 4
- Test with the Python script to confirm it's working
- For unlimited scaling → Visit OpenLLM Buddy
You now have complete control over a world-class AI model running on your own hardware. No cloud subscriptions. No data leaving your desk. Just pure, fast, private intelligence.
Fire up that terminal and run your first prompt today. 🚀