Connect n8n to OpenLLM Buddy
This guide shows how to call gemma4:26bfrom n8n so your workflows can send prompts and use the model's reply in later steps — without writing a custom backend.
Integration guide
What is n8n?
n8n is a workflow automation platform — think of it as a visual way to connect apps, APIs, webhooks, and custom logic. You build workflows from nodes: each node does one job (receive an email, read a spreadsheet row, call an API, post to Slack). When something happens (a schedule, a form submit, a new row), the workflow runs and passes data from node to node.
Teams use n8n to automate repetitive work without maintaining a separate server for every integration. You can run it in the cloud (n8n Cloud) or self-host on your own infrastructure. It is a strong fit when you want low-code automation but still need full control over HTTP calls and data mapping.
Why connect OpenLLM Buddy to n8n?
OpenLLM Buddy hosts open-source models on GPU with an OpenAI-compatible API. n8n does not ship a dedicated OpenLLM Buddy node, but it does include a generic HTTP Request node — that is all you need. Your workflow sends a chat-completions request to your deployed model and reads the assistant reply from the JSON response, the same way you would from OpenAI.
That means you can add LLM steps into automations you already run in n8n: summarize tickets, draft replies, classify messages, extract fields from documents, or chain multiple model calls — while keeping inference on your OpenLLM Buddy endpoint with flat-rate packs instead of per-token SaaS billing.
What you can build
- Webhook → model → Slack/email — user message in, summarized or answered reply out
- Scheduled reports — pull data from a database or API, ask the model to analyze it, deliver the result
- CRM or support tools — enrich or tag records using gemma4:26b on each new item
- Multi-step agents — one node calls the model, the next branches on the reply or calls another service
How this guide is structured
Below, the Connection detailssection lists the endpoint and API key placeholders for this page's model. The numbered steps walk through a single HTTP Request node in the n8n editor — method, URL, Authorization header, JSON body, and how to read choices[0].message.content in the next node. Copy the values, run a test execution, then save the workflow as a template for production.
Replace the example URL and key with yours from the console when you deploy. Screenshots use n8n's default UI; field names match n8n Cloud and self-hosted installs.
Connection details
Use these values in your HTTP Request node (steps 1–5 below). You need a chat-completions URL (where n8n sends POST requests) and an API key (sent as a Bearer token). For this walkthrough we use placeholder names YOUR_ENDPOINT and YOUR_API_KEY — substitute your real values from the console when you go live.
The endpoint must be the full path to /v1/chat/completions, not just the host. OpenLLM Buddy speaks the same JSON format as the OpenAI Chat Completions API, so n8n does not need a custom integration — only the generic HTTP Request node.
- YOUR_ENDPOINT
- http://openllmbuddy-proxy.botbuddytech.workers.dev/v1/chat/completions
- YOUR_API_KEY
- ob_sk_000000000000000000000000000000000000000000000001
Keep your API key secret — do not commit it to git or paste it into public workflow exports. In n8n you can later move the key into credentials or environment variables; this guide uses a header field so you can see exactly what is sent on the wire.
Create an HTTP Request node
Every call to OpenLLM Buddy from n8n goes through a single HTTP Request node. If you already have a trigger or data source (webhook, schedule, another app), add this node immediately after it so the model receives the incoming message as JSON.
- Open your workflow in the n8n editor — create a new workflow or open an existing one.
- Click the + button on the canvas (between nodes) or use the node panel on the right to add a step.
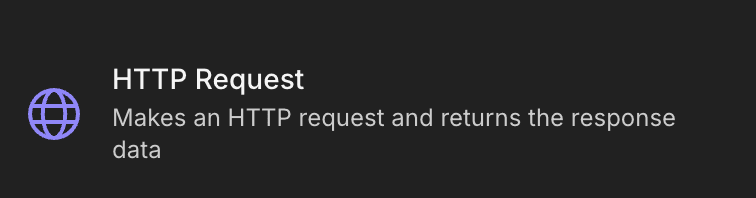
- In the search box, type HTTP Request and select HTTP Request — the description should mention making an HTTP request and returning response data.
- Leave the node selected; the next steps configure it on the Parameters tab.
You do not need the OpenAI node or any community node pack — the standard HTTP Request node is enough for OpenAI-compatible APIs.
Configure the HTTP Request node
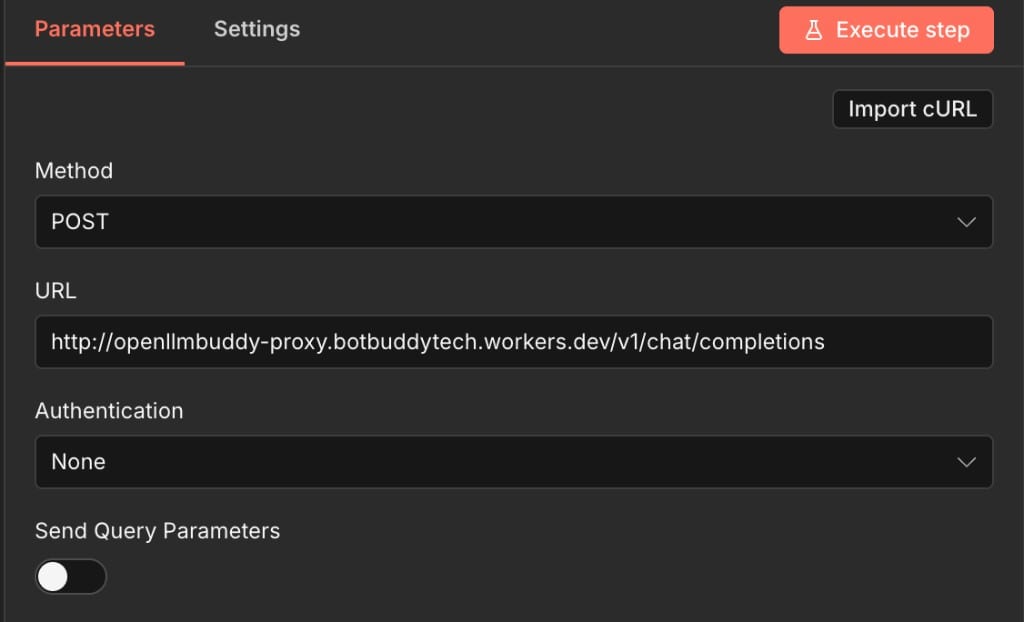
With the HTTP Request node selected, open the Parameters tab in the right panel. These settings tell n8n where to send the request and which HTTP method to use. We use POST because chat completions accept a JSON body in the request.
- MethodPOST — required for chat-completions with a JSON payload.
- URLPaste your full completions URL, e.g. http://openllmbuddy-proxy.botbuddytech.workers.dev/v1/chat/completions (YOUR_ENDPOINT). Use http:// or https:// exactly as shown in the console — a missing scheme or wrong path will return connection errors.
- AuthenticationNone — we add the API key manually under Send Headers in the next step so you can see the Authorization header format.
Do not enable "Ignore SSL Issues" unless you are debugging a self-signed certificate in a dev environment. For production, fix the certificate or use a proper HTTPS endpoint.
Add Authorization header
OpenLLM Buddy expects your API key in the Authorization header using the Bearer scheme — the same pattern as OpenAI. In the same HTTP Request node, scroll down to Send Headersand add one header row; do not use Basic Auth or the generic "Predefined Credential Type" unless you have already stored the key in n8n credentials.
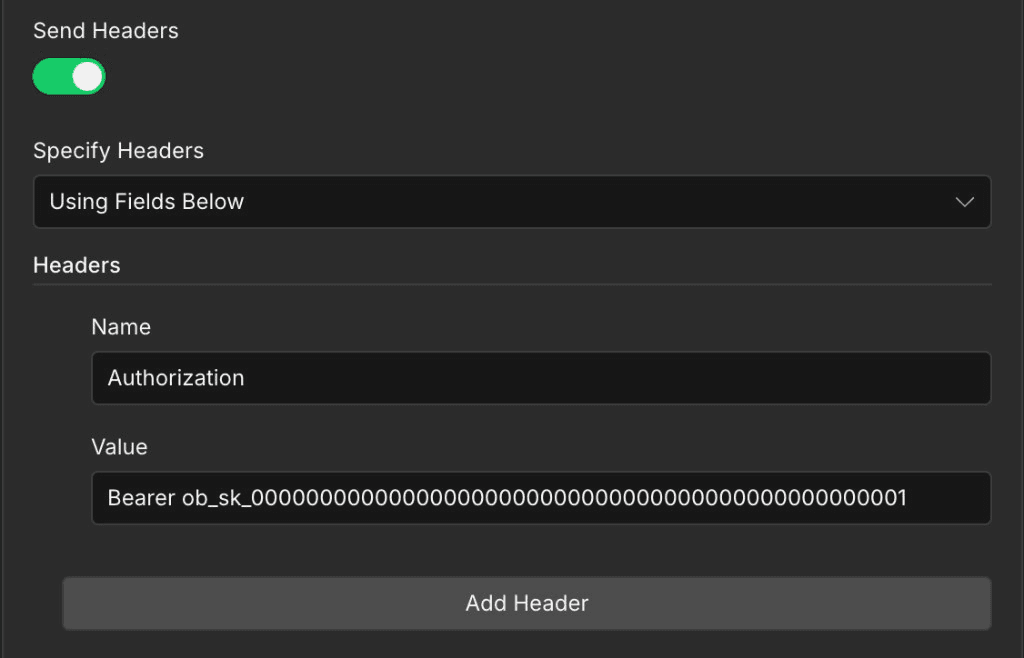
- Send HeadersToggle on so n8n includes custom headers on the request.
- Specify HeadersChoose Using Fields Below so you can type name and value explicitly.
- Header nameAuthorization — spelling and capitalization must match exactly.
- Header valueBearer ob_sk_000000000000000000000000000000000000000000000001 — the word Bearer, one space, then your YOUR_API_KEY with no extra quotes. A 401 response usually means a missing Bearer prefix or a wrong key.
If you rotate keys in the console, update this header (or your credential) before running production workflows again.
Add the request body
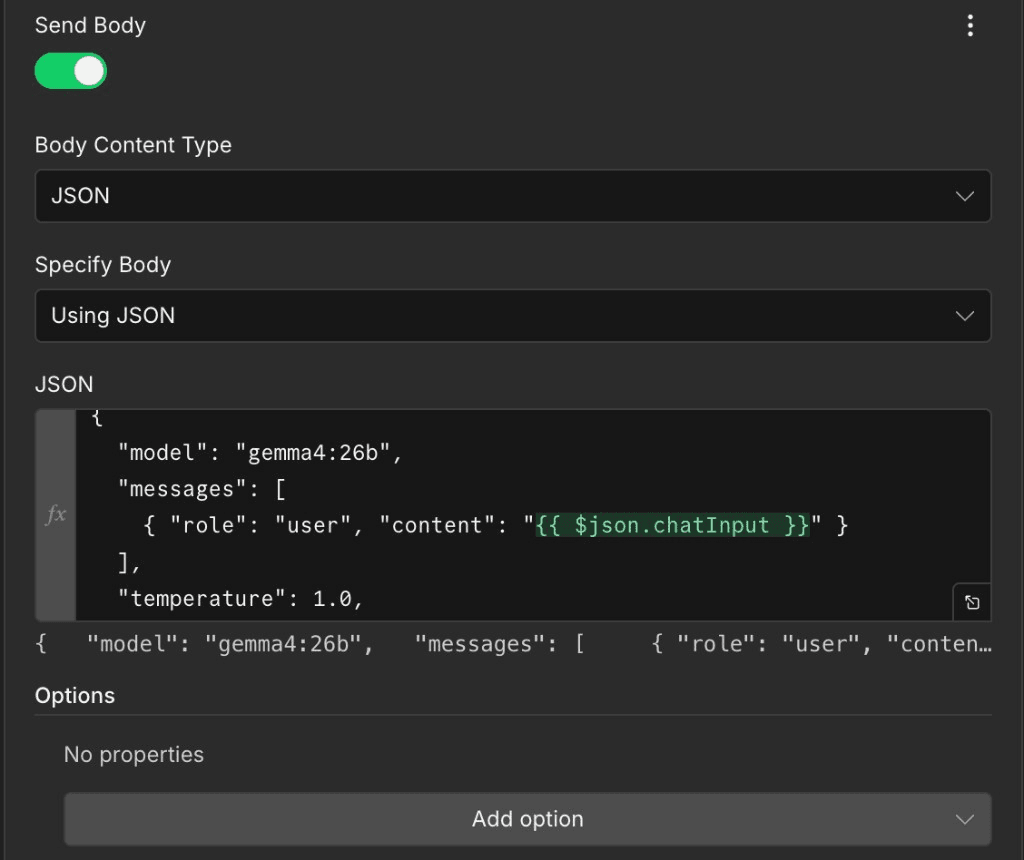
The request body tells OpenLLM Buddy which model to run and what message to answer. n8n sends it as JSON in the POST body. Scroll to Send Body on the same HTTP Request node and enable JSON mode — then paste the template below and adjust the model id if needed.
- Send BodyToggle on.
- Body Content TypeJSON — sets Content-Type: application/json automatically.
- Specify BodyUsing JSON — shows a JSON editor for the payload.
Use gemma4:26b for the model field (this page's deployment). The {{ $json.chatInput }} expression is an n8n placeholder: replace it with whatever field carries the user message from the previous node (e.g. {{ $json.body.message }} from a webhook).
Optional fields such as temperature and top_p control randomness; you can tune them later. The messages array must include at least one user role entry with non-empty content.
{
  "model": "gemma4:26b",
  "messages": [
    { "role": "user", "content": "{{ $json.chatInput }}" }
  ],
  "temperature": 1.0,
  "top_p": 0.95
}
Read the response
Click Execute step on the HTTP Request node (or run the whole workflow). A successful call returns HTTP 200 with OpenAI-compatible JSON. n8n often wraps the parsed body in an array with one object — the assistant text you need is at choices[0].message.content.
Wire that path into the next node: a Set node, Slack message, email, or another HTTP Request. If you see an empty reply, open the execution data and confirm choices exists and finish_reason is stop rather than an error payload.
- content — the assistant reply (use this in downstream nodes)
- reasoning — optional; some models include chain-of-thought text
- usage — prompt, completion, and total token counts for billing and monitoring
- model — echoes the model id that served the request (should match gemma4:26b)
[
  {
    "id": "chatcmpl-145",
    "object": "chat.completion",
    "created": 1779715432,
    "model": "gemma4:26b",
    "system_fingerprint": "fp_ollama",
    "choices": [
      {
        "index": 0,
        "message": {
          "role": "assistant",
          "content": "The assistant's reply to your prompt appears in this field.",
          "reasoning": "(optional — included by some models)"
        },
        "finish_reason": "stop"
      }
    ],
    "usage": {
      "prompt_tokens": 31,
      "completion_tokens": 1417,
      "total_tokens": 1448
    }
  }
]
Use in the next n8n node
After you run the HTTP Request node, read the model reply from choices[0].message.content.
{{ $json[0].choices[0].message.content }}